سبد خرید شما خالی است!
دسته بندی
- کالاهای جدید
- فروش ویژه
- آردوینو
- ماشین های مونتاژ PCB
- کتاب ها و پکیج های آموزشی
- کیت ها
- گلخانه هوشمند
- مینی پی سی
- سایر بردها
- قطعات الکترونیک
- ماژول های صوتی
- ارتباطات
- دوربین و تصویر برداری
- ربات های پرنده
- محصولات RFID
- سنسور ها و ماژول ها
- لیزر ها
- LED و لامپ
- USB Host
- اسکنر بارکد
- انکودر
- بخار ساز
- تاریخ و ساعت
- تشخیص اثر انگشت
- تشخیص سطح مایع
- تشخیص مانع و خط
- سایر ماژول ها
- سنجش مسافت
- سنسور پی هاش
- شعله و حرارت
- عصب و عضله
- فشار و ارتفاع
- ماژول دوربین
- مولد سیگنال
- نبض و فشار خون
- نیرو و وزن
- هاب
- هواشناسی
- پتانسیومتر
- پرینتر و چاپگر
- کارتخوان مغناطیسی
- کوره القایی
- کی پد و جوی استیک
- حرکت و لرزش
- شتاب و زاویه
- تشخیص گاز
- جریان و ولتاژ
- دما و رطوبت
- کارتخوان اس دی
- سوئیچ و رله ها
- صوت و آوا
- مکان یابی
- ژیروسکوپ
- لمس و فشار
- مبدل ها
- نور و رنگ
- آب و مایعات
- امواج مغزی
- رادیو اکتیو
- جریان آب
- مغناطیس
- گرد و غبار
- اثر هال
- ابزار آلات و تجهیزات
- آهنربا و مغناطیس
- ابزار اندازه گیری
- ابزار لحیم کاری
- اسکرچرها
- باکس و نگهدارنده
- برد بورد-مدار چاپی
- تبدیل ها
- تجهیزات کامپیوتری
- ترازوی دیجیتال
- دستگاه اسید کاری
- شیر برقی
- فن
- قفل های الکترونیکی
- قلم مو
- لوازم بسته بندی
- لوازم چاپ PCB
- محافظ برق شهری
- مولتی متر
- میکروسکوپ
- هاب
- هیتر ها
- پمپ
- چسب ها
- کابل و سیم
- کارت حافظه و مبدل
- پروگرامر و آنالایزر
- اسیلوسکوپ
- سایر
- ابزار
- منبع تغذیه و باتری
- موتور ها و درایور
- هوشمند سازی و امنیت
- نرم افزار ها
- نمایشگر ها و درایور
- قطعات رباتیک
- پروفیل و اتصالات مربوطه
- پرینتر سه بعدی
- محصولات واحد پرینت 3بعدی
- اسکنر سه بعدی
- ماشین های CNC و برش
- پروژه ها
رله تک کاناله بی سیم 433Mhz مدل KR2201
کد انبار : 6886-392-11125
مدل کالا : 433MHz KR2201 Relay
جستارش : B2-18-0303A
موجودی: در حال حاضر موجود نمی باشد. موجودی کالا
مدل کالا : 433MHz KR2201 Relay
جستارش : B2-18-0303A
موجودی: در حال حاضر موجود نمی باشد. موجودی کالا
قیمت:
222,430 تومان
رله تک کاناله بی سیم 433Mhz مدل KR2201
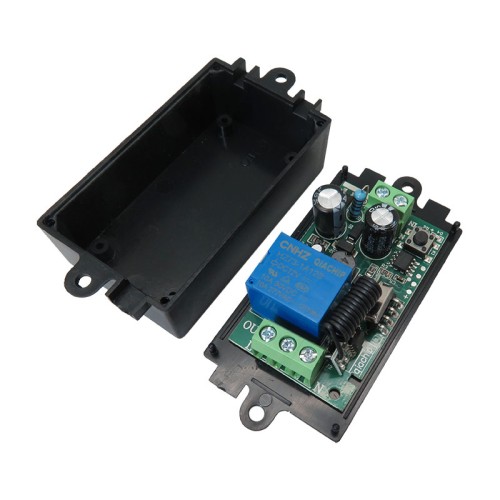
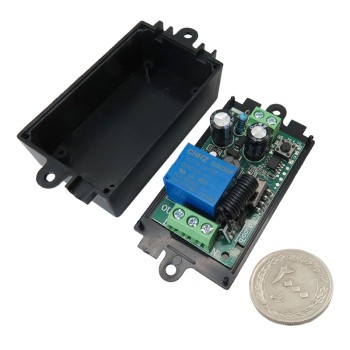
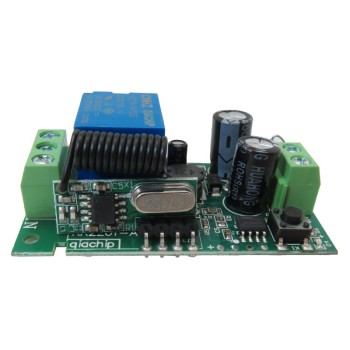
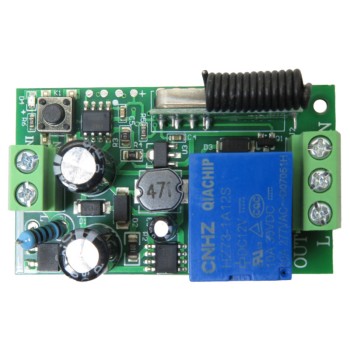
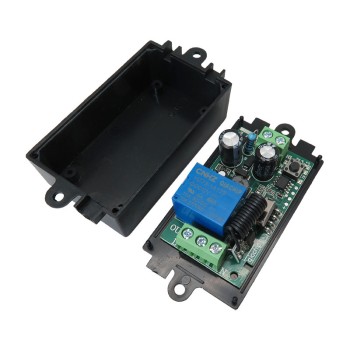
رله تک کاناله ریموت در باند فرکانسی 433 مگاهرتز، یک سوئیچ است که با اتصال ورودی به برق شهر خروجی به صورت یک رله با قدرت قطع و وصل است که از طریق آن میتوان هر نوع وسیله برقی(کولر، لامپ،موتور و …) با هر ولتاژی را روشن و خاموش کرد. این رله تک کانال 220 ولت AC قابلیت عملکرد به ۳ صورت را دارد (الاکلنگی،قطع و وصل،لحظه ای) و در فاصله ی 50 متری عملکرد دستگاه دیگر را در دو وضعیت خاموش یا روشن قرار می دهد.
این رله تک کاناله بی سیم 433Mhz مدل KR2201 است که به راحتی قطع و وصل قسمتی از مدار را انجام می دهد.
پاک کردن و کددهی:
پاک کردن و کددهی:
عملکرد پاک کردن: با فشردن دکمهٔ یادگیری "KEY" به تعداد 8 بار، پس از خاموش شدن نشانگر LED، تمام دادههای کدهای ریموت کنترل موجود در حافظه پاک میشوند. هنگامی که نشانگر LED پنج بار چشمک زده و سپس خاموش میشود، فرآیند پاک کردن کامل شده است.
عملکرد کددهی: با فشردن دکمهٔ یادگیری "KEY"، روشن شدن نشانگر LED نشان میدهد که میکروپروسسور وارد حالت یادگیری و کددهی شده است. با فشردن دکمهٔ مربوطه در ریموت کنترل، نشانگر LED سه بار چشمک زده و سپس خاموش میشود که نشاندهندهٔ موفقیت در کددهی است. این سوئیچ ریموت کنترل میتواند تا 16 ریموت مختلف را ذخیره کند. (این مدل دارای کددهی تکدکمهای است و برنامه بهطور خودکار بیتهای داده را تخصیص میدهد.)
آزمایش کددهی: پس از موفقیت در کددهی، با فشردن دکمهٔ مربوطه در ریموت کنترل، رلهٔ متناظر عمل کرده و عملکرد مورد نظر را انجام میدهد.
سیمکشی و آزمایش (طبق عکس):
با توجه به عملکرد کنترلی مورد نیاز، سیمکشی را بهدرستی انجام داده و پس از اتمام، صحت آن را بررسی کنید. لطفاً از انجام سیمکشی و آزمایش آن در حالت روشن بودن دستگاه خودداری کنید. شرکت ما مسئولیتی در قبال عواقب ناشی از عملکرد نادرست نخواهد داشت. در صورت بروز هرگونه سؤال یا مشکل، میتوانید با کارشناسان فنی ما مشورت کنید. ما با صمیمانهترین رویکرد، مشکلات مشتریان را حل خواهیم کرد.
پس از اطمینان از صحت سیمکشی، دستگاه را روشن کنید؛ نشانگر LED شروع به چشمک زدن میکند. تعداد چشمکها نشاندهندهٔ عملکرد انتخابشده است:
1 بار چشمک - عملکرد لحظهای
2 بار چشمک - عملکرد خودقفلشونده
3 بار چشمک - عملکرد قفل متقابل
با فشردن دکمهٔ مربوطه در ریموت کنترل، سوئیچ ریموت کنترل، شیء کنترلی متناظر را کنترل میکند. عملکرد صحیح کنترل نشاندهندهٔ موفقیت در آزمایش سیمکشی است و دستگاه میتواند بهطور عادی استفاده شود.
مشکلات رایج:
در هر زمان که دستگاه روشن است، میتوان عملیات پاک کردن و کددهی را انجام داد. در حین کارکرد مدار، با انجام عملکرد پاک کردن، پس از موفقیت، هر 4 رله به حالت عادی بازمیگردند. در عملکرد کددهی، پس از روشن شدن نشانگر LED، دستگاه وارد حالت کددهی میشود. زمان انتظار برای یادگیری حدود 6 ثانیه است؛ کددهی باید در این مدت انجام شود. پس از 6 ثانیه، نشانگر LED خاموش شده و برنامه بهطور خودکار از حالت کددهی خارج میشود.
در اولین استفاده، حتماً یکبار کدها را پاک کنید تا کدهای ریموت کنترل ذخیرهشده در تست کارخانه حذف شوند. پس از موفقیت در کددهی، نشانگر LED مربوط به کد ریموت کنترل معتبر روشن میشود. در صورت دریافت کد ریموت کنترل نامعتبر، نشانگر LED با نور کم و بهصورت ناگهانی چشمک میزند. با مشاهدهٔ نشانگر LED میتوان تشخیص داد که آیا تداخل از ریموت کنترلی با همان فرکانس وجود دارد یا خیر؛ اگر چشمک با نور کم مشاهده شود، تداخل وجود دارد.
با موفقیت در کددهی، میتوان حالت کاری خروجی را بهدلخواه تغییر داد؛ با تغییر جامپر پس از قطع برق، عملکرد تغییر میکند و نیازی به کددهی مجدد نیست.
سوئیچ کنترلی میتواند تا 16 کد ریموت کنترل را ذخیره کند. اگر کد ریموت کنترل هفدهم یاد گرفته شود، برنامه بهطور خودکار سرریز کرده و کد ریموت کنترل اول نامعتبر میشود و به همین ترتیب ادامه مییابد. در صورت بروز اختلال در کدهای ریموت کنترل، قبل از یادگیری، باید آنها را پاک کرد تا از تداخل با کدهای دیگر جلوگیری شود.
ریموت کنترلی که استفاده میشود، نیاز به کددهی و یادگیری دارد؛ زیرا ریموت کنترلهای عمومی هنگام خروج از کارخانه کددهی نشدهاند. میتوان آنها را مستقیماً یاد گرفته و استفاده کرد، اما در این صورت، ممکن است توسط ریموت کنترلهای دیگر بدون کددهی کنترل شوند.
در هنگام استفاده و نصب، سعی کنید از منابع تداخل دوری کرده و یک محفظهٔ محافظ مشابه ایجاد کنید؛ زیرا این امر مستقیماً بر حساسیت دریافت تأثیر میگذارد.
از استفادهٔ نادرست خودداری کنید؛ استفادهٔ نادرست باعث کاهش عملکرد و عمر محصول میشود و در موارد شدید، ممکن است بهطور مستقیم به محصول آسیب رسانده و خطراتی برای ایمنی شما ایجاد کند.
کاربرد رله تک کاناله وایرلس 433 مگاهرتز :
- روشنایی هوشمند
- پرده های کنترل از راه دور
- درب های کنترل از راه دور
مشخصات رله تک کاناله وایرلس 433 مگاهرتز :
- ولتاژ ورودی: 85 ~ 220V AC
- فرکانس کاری: 433 مگاهرتز
- حساسیت دریافت: 110 دسی بل
- توان بار: 1500W
- فاصله کنترل ریموت: 50 متر
- دمای کاری: -20~85 درجه سانتی گراد
- فاصله کنترل ریموت در فضای آزاد: بیشتر از 100 متر
- نوع کنترل ریموت: کد لرن
- مودهای کاری: inching, self-locking, and interlocking
- قابلیت کنترل 16 ریموت کنترل
مستندات:
معرفی رله تک کاناله 433MHz KR2201 Relay
عملکرد 433MHz KR2201 Relay
Description:
Lamps or other electrical household appliances can be controlled with the remote control, which is characterized by long range, sensitivity, high interference and stability.
The Single Channel Relay with RF Remote Controller brings together a latching relay with RF receiver and an RF remote control to switch ON/OFF the relay. This Single Channel Relay with 433MHZ RF Remote Controller can be used to wirelessly control your electrical appliances and can be operated with 220V AC.
Application:
intelligent lighting
ceiling lights
chandeliers
remote control curtains
remote control shutter doors
wireless access control
Features:
Input voltage: AC85V—AC220V
RF working frequency: 433M
RF working mode: super heterodyne receiving
Receiving sensitivity: -110dbm
Total load power: 1500W
Remote control distance: 50
Working temperature: -20~85
Remote control distance: open area greater than 100 meters
Support remote control type: learning code
Multiple working modes: inching, self-locking, and interlocking
Wiring:
L : Firewire input
N : Neutral line input
OUT L : Live wire output
UT N : Neutral output
Clear and code:
1. Clear function-After pressing the learning button " KEY " 8 times , let go after the LED indicator turns off, and begin to clear all the remote control code data in the memory. When the LED indicator flashes 5 times and then turns off, the clear function is completed.
2. Code matching function-press the learning button " KEY " , the LED indicator lights up to indicate that the microprocessor enters the learning and code matching state, press the matching wireless remote control button, the LED indicator flashes 3 times and then goes out to indicate The code pairing is successful. The wireless remote control switch can store 16 different remote controls. (This model is one-key code matching, the program will automatically allocate the data bits)
3. Code pairing test——After the code pairing is successful, press the corresponding relay of the remote control to make the corresponding function action.
Wiring and testing
1. Correctly standardize the wiring according to the control function you need, and check whether the wiring is correct after the wiring is completed. Please do not operate the wiring and try the wiring with power on. Our company will not be responsible for the adverse consequences caused by irregular operation. If you encounter any questions or problems that cannot be solved, you can consult the relevant technical personnel of our company for assistance. We will definitely solve the related problems encountered by customers with the most sincere service attitude.
2. After confirming that the wiring is correct, turn on the power and the LED indicator flashes. The number of flashes can determine the selected function.
* Flashes 1 times - Jog function
* 2 flashes -self-locking function
* 3 flashes -interlock function
3. Press the corresponding remote control button, and the remote control switch controls the corresponding control object. Normal control of the control means that the wiring test is successful and it can be used normally.
common problem:
1. When the power is turned on, the code can be cleared and coded at any time. When the circuit is working, the clearing function is performed. After the clearing is successful, the 4 relays will return to normal state. In the code matching function, after the LED indicator lights up, it enters the code matching state. The learning waiting time is about 6 seconds. The code matching needs to be completed within these 6 seconds. After 6 seconds, the LED indicator turns off and the program automatically exits the code matching state.
2. When using it for the first time, be sure to clear the code once and clear the factory test to store the remote control code. After the code is successfully matched, the LED indicator of the valid remote control code will be lit. If an invalid remote control code is received, the LED indicator will flash with low light and burst. Look at the LED indicator to determine if there is interference from the remote control at the same frequency. If there is a low-bright flash.
3. As long as the code is successfully matched, the output working mode can be changed arbitrarily, and the function can be changed by changing the jumper cap selection after disconnecting the power supply. No need to check the code again.
4. The control switch can store 16 remote control codes. If 17 remote control codes are learned, the program will automatically overflow and the first remote control code will become invalid. And so on. When the remote control code is confused, it should be cleared before learning to avoid interference with other remote control codes.
5. The remote control used needs to be coded and learned, because the general coded remote control is not coded when it leaves the factory. It is okay to take it and learn and use it directly, but it will be controlled by other remote controls without coding.
6. When using and installing, try to avoid interference sources and form a similar shielding enclosure. It will directly affect the receiving sensitivity.
7. Do not use it abnormally. Abnormal use will reduce the performance and life of the product. In severe cases, it will directly damage the product and bring hidden dangers to your safety.


